Lab: Load Testing
In this lab, you will practice load testing an application and improving its performance using caching.
You will work with a relational databases (PostgreSQL), a key-value store (Redis), and a column-oriented database (InfluxDB).
Instructions
You should work on this assignment either individually or with a partner.
Step 1: Motivation and Warning
When creating a web application, it is useful to know how many users can simultaneously interact with it before its performance degrades (e.g., pages stop loading in a reasonable amount of time). The number of users an application can support depends on multiple factors:
- How frequently users load different pages
- Some pages may be loaded more frequently than others
- Some pages may be more complicated to render than others
- The amount of resources needed to render pages (e.g., use of memory, CPU, disk, and network)
- The hardware the web application is running on (e.g., availability of memory, CPU, disk, and network)
For a real website, you could record real users’ activity on your website. You might assume that each IP address you see in the network traffic corresponds to different user. By replaying these requests more quickly (e.g., 1.5x as fast, 2x as fast, etc.), you could find the point at which your site’s performance degrades. This would allow you to accurately estimate how many users you can support per unit of time (e.g., 10,000 users per hour). Of course, this estimate would assume the distribution of pages loaded by users remains consistent, your webpages aren’t modified to load more quickly (or slowly), etc.
For this lab, we will greatly simplify this problem by focusing on a single page, the MiniFacebook homepage, hosted on your own device.
Warning
You must ask permission before load testing someone else’s website. Load testing can easily overwhelm a website, causing it to become unresponsive. This is a form of cyberattack known as a denial-of-service attack. The network traffic associated with load testing can also overwhelm network equipment. To avoid these issues, in this lab we will host both the load testing software and the MiniFacebook application on your device.
Note: In the real world, you would run the load testing software and the web application on different devices, perhaps even in different locations. This could improve the measured performance of the web application, since the load testing software would consume resources from a different device, rather than competing for resources on a single device. This could also decrease the measured performance of the web application, since network latency and bandwidth would affect performance. Of course, you would need to be careful not to take your own website offline when load testing it.
Note: If you were a criminal, running a denial-of-service attack from your own device or network connection would be a terrible idea, since it would be trivial to identify you (e.g., based on your device’s MAC address or your network connection’s IP address). Instead, criminals run denial-of-service attacks from hacked devices.
Step 2: Set Up Load Testing Software
Follow the “Getting Started” instructions in the docker-k6-grafana-influxdb repository to set up the software we will use for load testing.
If the software is set up correctly, you will see results in the “Requests per Second” graph in the dashboard.
Step 3: Determine Maximum Throughput
We will measure the maximum average requests per second the MiniFacebook homepage can support, when running on your device. This is a measure of throughput.
As an analogy, imagine you are the owner of a restaurant, and you want to know how many orders per hour your restaurant can fulfill. You cannot estimate this by simply placing one order, and extrapolating based on the time it took you to receive it, for several reasons. First, the restaurant has multiple workers who can work on multiple orders at the same time. Second, the service might seem fast when a small number of orders are placed, but get slower if a high volume of orders are placed (e.g., if the kitchen staff get overwhelmed).
The same problems apply to web applications, so simply loading a page in your web browser cannot give you a good sense for how many simultaneuous users a web application can support. Instead, load testing tools like k6 allow you to place many requests simultaneously, sustained over a period of time. Using a load testing tool, you can increase the rate of page requests until the rate of requests fulfilled stops increasing. The maximum rate of requests fulfilled per unit of time (e.g., per second) tells you the maximum throughput of the web application.
Next, I describe the process I followed to determine the maximum throughput of the application on my laptop. Since the performance characteristics of the application will vary by device, you should follow the same steps on your device.
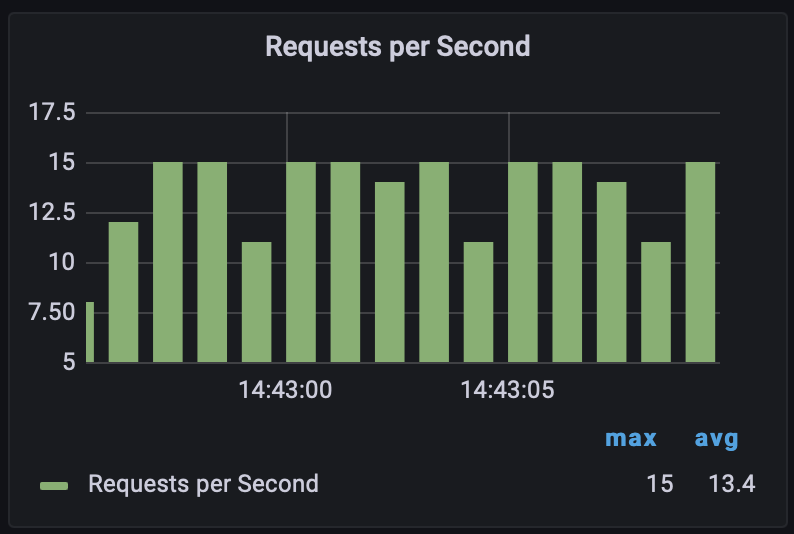
The initial results of load testing show a maximum of 15 requests completed per second, but the average requests per second is more informative. However, the average displayed in the bottom-right of the graph is misleading until zooming in. This is because there is a period of ramping up and ramping down at the beginning and end of the load test.

Zooming in to the middle ~10 seconds of load testing shows 13.4 average requests second.
However, we might be able to increase the throughput by increasing the rate at which we make requests. scripts/minifacebook.js describes how the load test is run:
import http from 'k6/http';
import { check, sleep } from "k6";

export let options = {
  stages: [
      // Ramp-up from 1 to 5 virtual users (VUs) in 5s
      { duration: "5s", target: 5 },

      // Stay at rest on 5 VUs for 10s
      { duration: "20s", target: 5 },

      // Ramp-down from 5 to 0 VUs for 5s
      { duration: "5s", target: 0 }
  ]
};

export default function () {
  const response = http.get("http://nginx/minifacebook/");
  check(response, { "status is 200": (r) => r.status === 200 });
  sleep(.300);
};
Notice that sleep(.300) makes each “virtual user” of the site wait before reloading the page. Delete sleep(.300), so after a virtual user’s page load completes, they will immediately reload the page.
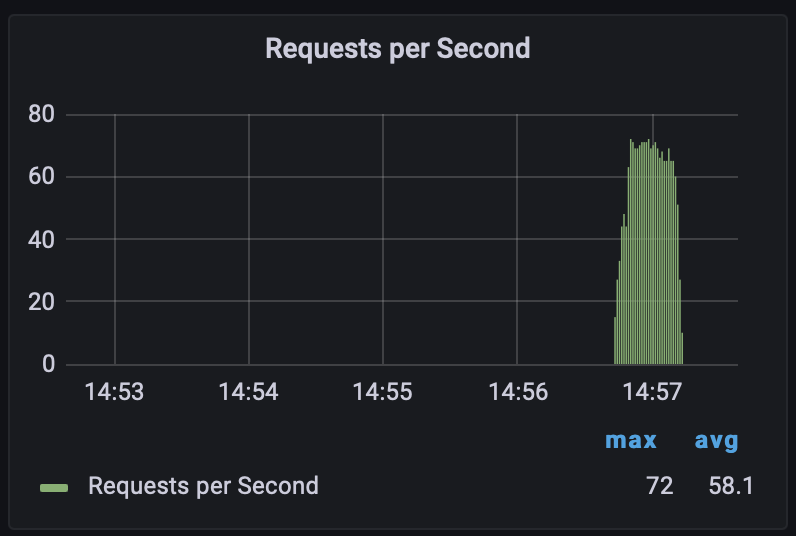
Re-running the load test after eliminating the wait, we see that more requests are served per second:
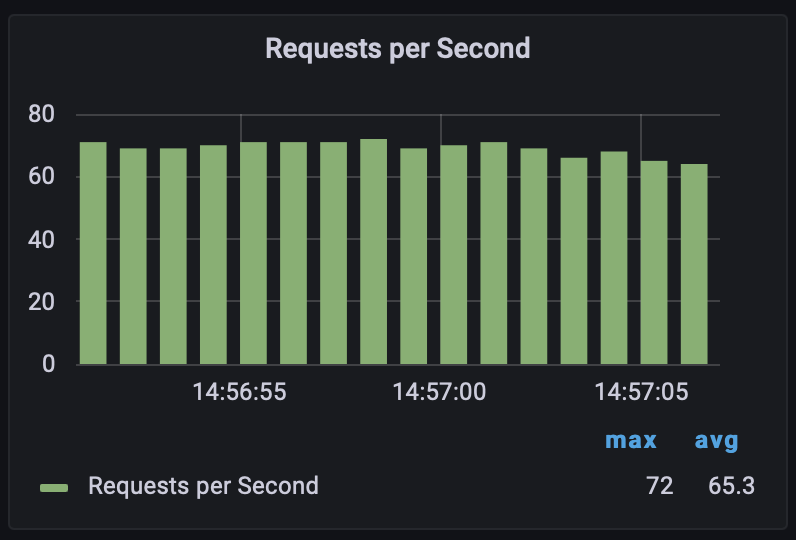
Zooming in to the middle ~10 seconds of load testing shows 65.3 average requests per second.
This might be the maximum number of requests per second the application can suport on my laptop. To be sure, I edited minifacebook.js to double the number of virtual users, going from 5 to 10. If the average requests per second doesn’t change despite increasing the number of virtual users, then I will know I have a good estimate for the maximum. But if the average requests per second does increase, I will repeatedly double the number of virtual users until the average requests per second stops increasing.
Note: This iterative process helps us determine whether the web application or the load testing configuration is limiting the throughput.
Re-running the load test after doubling the number of virtual users, it isn’t clear whether the number of requests served per second has increased:

Zooming in to the middle ~10 seconds of load testing shows 59.7 average requests per second.
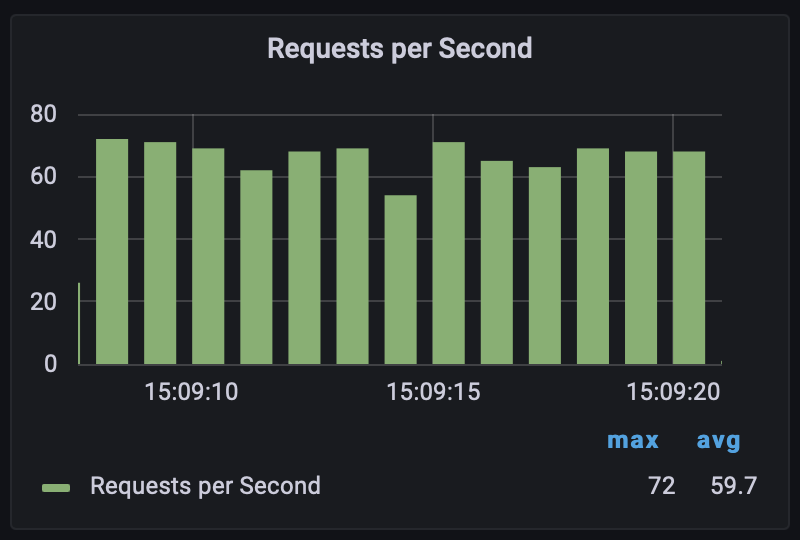
Since we did not see an increase in throughput from adding more virtual users, I am confident that the web application can support about 60 requests per second on my laptop.
Step 4: Use Caching to Improve Performance
Each time the MiniFacebook homepage is loaded, the database is queried for the latest statuses. Assuming we are willing to show (slightly) outdated information, we might be able to improve performance using caching. To do this, we will use the Redis key-value store.
First, add these lines to your docker-compose.yml file in the csci220-django repository:
  redis:
    image: redis:7.2
    restart: unless-stopped
This will set up Redis in a Docker container.
Next, add these lines to requirements.txt, again in the csci220-django repository:
django-redis-cache==3.0.1
redis==3.5.3
Also, add these lines to django/djangoproject/djangoproject/settings.py:
CACHES = {
    'default': {
        'BACKEND': 'redis_cache.RedisCache',
        'LOCATION': 'redis:6379',
    },
}
These changes will allow Django to communicate with the Redis server.
Next, follow these instructions to configure caching for the MiniFacebook homepage. I recommend adding the cache_page decorator to django/djangoproject/minifacebook/views.py, using an appropriate cache timeout.
Finally, apply your changes:
docker compose stop
docker compose up -d --build
Try loading http://127.0.0.1:8080/minifacebook/ in your browser, to ensure the page still loads.
After making these changes, measure the maximum throughput again. If necessary, increase the number of virtual users. You will know your changes worked if you see a dramatic improvement in throughput.
Submit
- The application’s maximum average requests second, before you added caching
- The application’s maximum average requests second, after you added caching
- A calculation of how much the throughput increased after adding caching (e.g., 2x greater throughput?)
- Assume that a real user issues a new request every 10 seconds. With and without caching, how many simultaneous real users could the MiniFacebook homepage support? Show your calculations.
- Explain the benefits and drawbacks associated with this kind of caching. In particular:
- What types of pages could you use this kind of caching for?
- What types of pages shouldn’t you use this kind of caching for?
The assignment will be graded as part of your assignment grade.