Problem Set 10
Preliminaries
In your work on this assignment, make sure to abide by the collaboration policies of the course.
If you have questions while working on this assignment, please come to TA help hours or post them on Piazza
Make sure to submit your work on Gradescope, following the procedures found at the end of the assignment.
due by 10:00 p.m. on Friday, October 6, 2023
Suggested self-deadline of Wednesday, October 4, 2023
Important note regarding test cases and Gradescope:
-
You must test each function after you write it. Here are two ways to do so:
- Run your file after you finish a given function in the Python Interactive Window, where you can call the function using different inputs and check to see that you obtain the correct outputs.
-
Add test calls to the bottom of your file, inside the
if __name__ == '__main__'control structure. For example:if __name__ == '__main__': print("mystery(6,7) returned", mystery(6,7))
These tests will be called every time that you run the file, which will save you from having to enter the tests yourself. We have given you an example of one such test in the starter file.
-
You must not leave any
printstatements in the global scope. This will cause an error with the Gradescope autograder. Make sure all of yourprintstatements are inside a function scope or inside theif __name__ == '__main__'control structure.
Problem 1: Image processing with loops and image objects
35 points; pair-optional or group-of-three-optional
See the rules for working with a partners on pair-optional problems for details about how this type of collaboration must be structured.
Background
We will work with images stored in PNG format.
Images are composed of pixels, and that the color of each
pixel can be represented by a list of RGB values–three integers
between 0 and 255 that represent the amount of red, green, and blue
that is present in that pixel.
Getting started
Begin by downloading the following zip file:
ps10image.zip
Unzip this archive, and you should find a folder named ps10image,
and within it several files, including ps10pr1.py. Open that file
in VS Code, and put your work for this problem in that file.
You should not move any of the files out of the ps10image folder.
Keeping everything together will ensure that your functions are able to
make use of the image-processing module that we’ve provided.
Among the files in the ps10image folder are several PNG images that you
can use when testing your functions. They include the following:
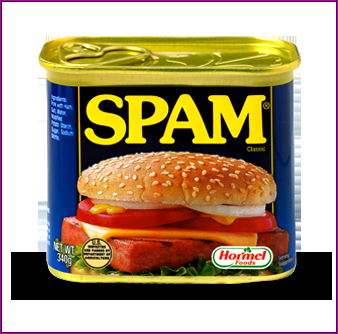
test.png:

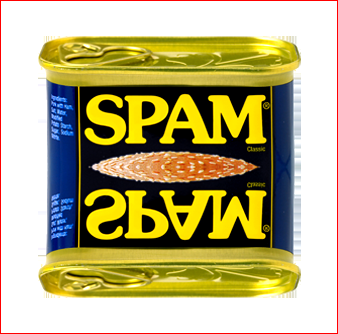
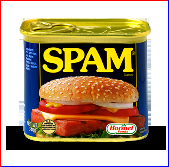
spam.png:
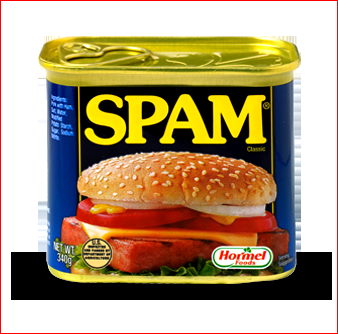
Important: Both of these images have a one-pixel border; test.png
has a blue border, and spam.png has a red one.
When you create a new image that is based on one of these images,
these borders should help you to ensure that you are transforming the
entire image.
Sample function
In ps10pr1.py, we’ve given you the following example of a function
that processes a PNG image:
def invert(filename):
    """ loads a PNG image from the file with the specified filename,
        and creates a new image in which the colors of the pixels are
        inverted.
    """
    # create an image object for the image stored in the
    # file with the specified filename
    img = load_image(filename)

    # determine the dimensions of the image
    height = img.get_height()
    width = img.get_width()

    # process the image, one pixel at a time
    for r in range(height):
        for c in range(width):
            # get the RGB values of the pixel at row r, column c
            rgb = img.get_pixel(r, c)
            red = rgb[0]
            green = rgb[1]
            blue = rgb[2]

            # invert the colors of the pixel at row r, column c
            new_rgb = [255 - red, 255 - green, 255 - blue]
            img.set_pixel(r, c, new_rgb)

    # save the modified image, using a filename that is based on the
    # name of the original file.
    new_filename = 'invert_' + filename
    img.save(new_filename)
To test it, run ps10pr1.py in VS Code, which will bring you to the Shell,
and enter the following function call:
>>> invert('test.png')
If all goes well, you should see the following message:
invert_test.png saved.
In addition, when you look in your ps10image folder, you should now see a
file named invert_test.png (although the .png extension may or may not be
visible). Double-clicking on that file should show you the following image:

Image-processing functions, objects and methods
The invert() function illustrates most of the key
features of the image-processing module that we’ve given you.
The function begins as follows:
img = load_image(filename)
This line uses the load_image() function, which takes a string
representing the name of a PNG image file, loads that image from disk,
and creates a representation of the image that we can manipulate in our
code. After this line of code executes, the variable img represents
the whole image! More precisely, the variable img represents an
image object.
As discussed in the video examples and in class, one important property of objects is
that they carry around functions inside themselves that we can call to
obtain information about the object or to modify its
contents. Functions that belong to an object are called methods, and
we call them using the dot . operator.
Here is a reminder of the key methods that are available inside every image object:
|
method name |
what it does |
|---|---|
|
|
returns the width of the
image represented by the
image object |
|
|
returns the height of the
image represented by the
image object |
|
|
returns the list of RBG
values for the pixel at
row |
|
|
changes the RBG values
values for the pixel at
row |
|
|
saves the image
represented
by the image object |
Your tasks
Use nested for loops to define the functions described below:
-
Write a function
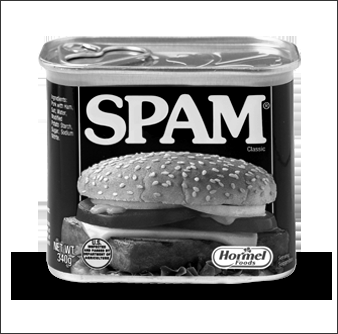
grayscale(filename)that loads the PNG image file with the specifiedfilename, creates a new image that is a grayscale version of the original image, and stores it in a file namedgray_*filename*, where*filename*is the name of the original file.The pixels of your grayscale image should be based on the brightness of each pixel. The brightness of a pixel
[r,b,g]can be computed using this formula:(21r + 72g + 7b) // 100
We’ve given you a helper function called
brightness()that you should use to make this computation.Once you have a pixel’s brightness, you should use it as the value for all three of the colors of the grayscale version of the pixel. For example, the pixel
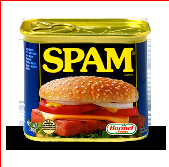
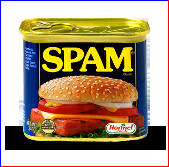
[100,200,0]has a brightness of165, and thus it should be replaced by the pixel[165,165,165]in the grayscale version of the image. For example, here is the grayscale version ofspam.png:
Notes/hints:
-
We strongly encourage you to use our
invert()function as a model for this function. -
Make sure that the new file that you create has the name
gray_filename, wherefilenameis the name of the original file. For example, the file produced for the grayscale version ofspam.pngshould be calledgray_spam.png. See ourinvert()function for a model of how to construct one filename from another. -
Don’t forget to take advantage of the
brightness()function that we’ve given you. -
In your work on all of the functions for this problem, you should continue to follow the guidelines for coding style and readability that we gave you in the previous problem.
-
-
Write a function
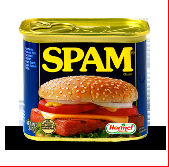
bw(filename, threshold)that loads the PNG image file with the specifiedfilenameand creates a new image that is a black-and-white version of the original image. The second input to the function is an integerthresholdbetween 0 and 255, and it should govern which pixels are turned white and which are turned black. If a pixel’s brightness (as determined by thebrightness()helper function that we’ve given you) is greater than the specifiedthreshold, the pixel should be turned white ([255,255,255]); otherwise, the pixel should be turned black ([0,0,0]). For example, here is a black-and-white version ofspam.pngthat was created using a threshold of 100:
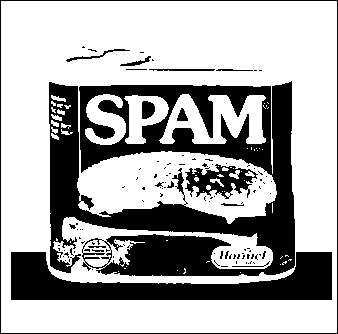
The new image file should have the name
bw_filename, wherefilenameis the name of the original file. For example, when you turnspam.pnginto a black-and-white image, the resulting file should be namedbw_spam.png.Notes/hints:
-
Don’t forget to take advantage of the
brightness()function that we’ve given you. -
In your work on all of the functions for this problem, you should continue to follow the guidelines for coding style and readability that we gave you in Problem 1.
-
-
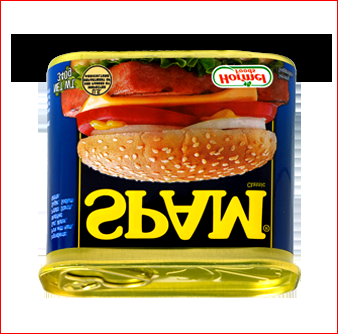
Write a function
fold_diag(filename)that loads the PNG image file with the specifiedfilenameand creates a new image in which the original image is “folded” along its diagonal. For example, here is the result of foldingspam.pngalong its diagonal:

The new image should have the same dimensions as the original image.
The new image file should have the name
fold_filename, wherefilenameis the name of the original file. For example, whenspam.pngis folded, the resulting file should be namedfold_spam.png.Notes/hints:
-
Although we refer to this process as “folding” the image, you will simply need to change the RGB values of the pixels that appear below the diagonal, giving them the RGB values for the color white (
[255,255,255]). -
The pixels along the diagonal are the ones in which the row index is equal to the column index. Those pixels should be left unchanged in the new image; only the pixels below the diagonal should be changed to white.
-
If the image’s height and width are not the same, you won’t obtain a perfect fold. For example, in the folded spam image shown above, the lower right-hand corner of the original image is still present in the folded image. That is to be expected.
-
Problem 2: Image processing, continued
45 points; pair-optional or group-of-three-optional
Open the file ps10pr2.py in VS Code, and put your work for this problem in that file.
You should not move any of the files out of the ps10image folder.
Keeping everything together will ensure that your functions are able to
make use of the image-processing module that we’ve provided.
-
Write a function
flip_vert(filename)that loads the PNG image file with the specifiedfilenameand creates a new image in which the original image is “flipped” vertically. In other words, the bottom of the original image should now be on top, and the top of the original image should now be on the bottom. For example, here is the result of flippingspam.pngvertically:
The new image file should have the name
flipv_filename, wherefilenameis the name of the original file. For example, whenspam.pngis flipped horizontally, the resulting file should be namedflipv_spam.png.Notes/hints:
-
Creating a new blank image
In ourinvert()function, we modified the image object represented by the variableimgto create our inverted image. In this problem, it’s trickier to modify the image object “in place”, because we can end up losing portions of the image that we will need later on.The easiest way to avoid this problem is to create a new image object with the same dimensions as the original image. You can do so by using the following lines at the beginning of your function:
 img = load_image(filename)
 height = img.get_height()
 width = img.get_width()
 new_img = Image(height, width)   # create a new, blank image object
Once these lines have executed,
new_imgwill represent a new, blank image with the same height and width as the original image. Then, as you use nested loops to process the image, you can continue to useimg.get_pixel(...)to get a pixel from the original image, but you should usenew_img.set_pixel(...)to set a pixel in the new, flipped image. In addition, make sure that you savenew_imgat the end of the function, rather thanimg. -
When computing the appropriate coordinates for a flipped pixel, don’t forget that valid
(r,c)coordinates for an image of heighthand widthware the following:0 ≤ r ≤ h - 1
0 ≤ c ≤ w - 1Given these ranges, where should a pixel from the first row of the original image go in the new, flipped image? Where should a pixel from the second row of the original image go? Where should a pixel from the
rth row of the original image go? -
Important: A new blank image is filled with green pixels. If you see unexpected green pixels in your new image (e.g., at the borders of the image), there is a bug in your function that you will need to fix.
-
Read the FAQ for hints!
-
-
Write a function
mirror_vert(filename)that loads the PNG image file with the specifiedfilenameand creates a new image in which the original image is “mirrored” vertically. In other words, the bottom half of the pixels in each column should be replaced by the reversed top half of the pixels from the same column. For example, here isspam.pngmirrored vertically:
The new image file should have the name
mirrorv_filename, wherefilenameis the name of the original file. For example, whenspam.pngis mirrored vertically, the resulting filename should be calledmirrorv_spam.png.Notes/hints:
-
You’ll need to adjust the number of iterations performed by at least one of your two nested loops.
-
When computing the appropriate coordinates for a mirrored pixel, the coordinate ranges discussed in [Problem 1][pr1] still apply:
0 ≤ r ≤ h - 1
0 ≤ c ≤ w - 1Given these ranges, where should a pixel from the topmost row of a given column be mirrored on the bottom half? Where should a pixel from the second row of a given column be mirrored? Where should a pixel from the
rth row of the original image be mirrored?
-
-
Write a function
reduce(filename)that loads the PNG image file with the specifiedfilenameand creates a new image that is half the size of the original image. It should do so by eliminating every other pixel in each row (to reduce the image horizontally) and by eliminating every other row (to reduce the image vertically).There are different approaches that you can take to this problem, and there are two possible results that you can obtain when you reduce a given image. For example, here is one reduced version of
spam.png:
Note that the right and bottom borders have been eliminated by the reduction. Here is the other:
In this version, the left and top borders have been eliminated by the reduction. Either result is acceptable.
The new image file should have the name
reduce_filename, wherefilenameis the name of the original file. For example, whenspam.pngis reduced, the resulting file should be namedreduce_spam.png.Notes/hints:
-
As with the previous function, we recommend creating a new image object at the start of your function; it can be used to set the pixels of the reduced image, and to save the resulting image. Use integer division to determine the dimensions of the reduced image.
-
Rather than attempting to write loops that skip over rows and columns, you may find it easier to use your nested loops to iterate over the rows and columns of the newly created object–the
one that represents the reduced image. You can then perform the necessary computations on your loop variables
randcto determine the cooordinates of the pixel from the original image that you should use for the pixel at position(r, c)in the reduced image. Use concrete cases to determine the appropriate computations.-
The final note for the previous function also applies here.
-
To help you with testing, we have created an image called
spam_two.pngthat has a two-pixel border:
The outermost border is still red, but the inner border is blue.
When you reducespam_two.png, you should get one of the following results, either of which is acceptable:
-
-
Write a function
extract(filename, rmin, rmax, cmin, cmax)that loads the PNG image file with the specifiedfilenameand extracts a portion of the original image that is specified by the other four parameters. The extracted portion of the image should consist of the pixels that fall in the intersection of- the rows of pixels that begin with row
rminand go up to but not including rowrmax - the columns of pixels that begin with column
cminand go up to but not including columncmax.
For example, the call
extract('spam.png', 90, 150, 75, 275)
should produce the following image

The new image file should have the name
extract_filename, wherefilenameis the name of the original file. For example, whenspam.pngis processed byextract, the resulting file should be namedextract_spam.png.Notes/hints:
-
As you did in the
flip_horizandreducefunctions from [Problem 1][pr1], you should create a new image object at the start of your function; it can be used to set the pixels of the extracted image, and to save the resulting image. Compute the dimensions of the new image from the inputs to the function. -
Don’t forget that the
rmaxandcmaxparameters are exclusive, which means that the extracted image should not include pixels from rowrmaxor columncmaxof the original image. This is similar to what happens when you slice a string or list, and it should make it easier to compute the dimensions of the image. -
As was the case with the
reducefunction, you may find it easier to use your nested loops to iterate over the rows and columns of the newly created object–the one that represents the extracted image. You can then perform the necessary computations on your loop variablesrandcto determine the cooordinates of the pixel from the original image that you should use for the pixel at position(r, c)in the new image. Use concrete cases to determine the appropriate computations.
- the rows of pixels that begin with row
Problem 3: Color Tinting and Green Screen Image Processing
20 points; pair-optional or group-of-three-optional
Create a new Python file ps10pr3.py in VS Code, and put your work for this problem in that file.
You should work on this file within the ps10image folder.
Keeping everything together will ensure that your functions are able to
make use of the image-processing module that we’ve provided.
-
Write a function
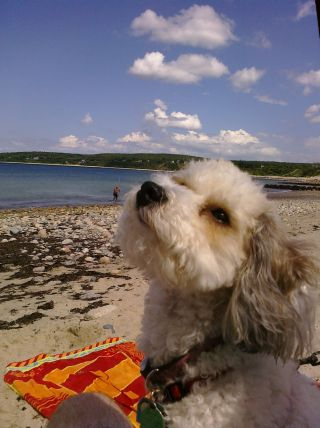
sunset(filename)that loads the PNG image file with the specifiedfilename, creates a new image that looks like a sunset filter.Example input and output images:

The new image file should have the name
sunset_filename, wherefilenameis the name of the original file. For example, whencody.pngis processed by sunset, the resulting file should be namedsunset_cody.png.Notes/hints:
-
Recall the valid range of colors integers is 0 to 255. Avoid setting any color value outside of that range.
-
Rather than increasing the amount of red, you should reduce the amount of green and blue.
-
Feel free to experiment. The autograder will just look for the relative amount of red versus green and blue.
-
In 2012, Facebook purchased Instagram for $1 billion. It wasn’t much different than this!
-
-
Write a function greenscreen(foreground, background) that loads two PNG image files with the specified foreground and background filenames and creates a new image that composes the foreground image with the background image using the Green Screen effect.
You can read more about this here:
https://en.wikipedia.org/wiki/Chroma_key
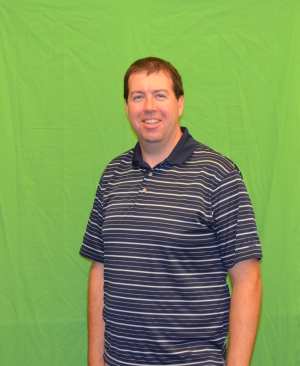
Example foreground, background, and result images:
The new image file should have the name
greenscreen_filename, wherefilenameis the name of the original file. For example, whenprof.pngis the foreground image, the resulting filename should be calledgreenscreen_prof.png.Notes/hints:
-
You should work with your own images (and submit your resulting image!). We will have a Green Screen for you to use in class.
-
The image with the green screen is the foreground image.
The image with the scene is the background image. -
When working with your own pictures, you should resize and crop both input images to the same size using an image editing program. The above examples are 300 pixels wide. We suggest making your images no larger than 1000 pixels wide. If your images are not the same size you risk going out of bounds on one of the image dimensions.
-
To create the output image, loop over every pixel in the foreground image. If the pixel is green, use the pixel from the same location in the background image, otherwise use the pixel from the foreground image.
-
We suggest writing a helper function is_green(pixel) that returns True for a green pixel and False for a non-green pixels.
-
There are many shades of green, only selecting [0, 255, 0] will not work very well. Selecting any pixel that has more than 200 green would also capture white pixels [255, 255, 255] and many others. Experiment and come up with a formula to make the decision in your helper function.
-
The output does not need to be exact, as long as it correctly uses the background image in most of the green pixels and the foreground image in most of the non-green pixels.
-
Submitting Your Work
You should use Gradesope to submit the following files:
- your
ps10pr1.pyfile containing your solutions for Problem 1 - your
ps10pr2.pyfile containing your solutions for Problem 2 - your
ps10pr3.pyfile containing your solutions for Problem 3 - your greenscreen result png file with you in it from Problem 3.
Warnings
-
Make sure to use these exact file names, or Gradescope will not accept your files. If Gradescope reports that a file does not have the correct name, you should rename the file using the name listed in the assignment or on the Gradescope upload page.
-
If you make any last-minute changes to one of your Python files (e.g., adding additional comments), you should run the file in VS Code after you make the changes to ensure that it still runs correctly. Even seemingly minor changes can cause your code to become unrunnable.
-
If you submit an unrunnable file, Gradescope will accept your file, but it will not be able to auto-grade it. If time permits, you are strongly encouraged to fix your file and resubmit. Otherwise, your code will fail most if not all of our tests.